Capos are a way to give your hand a little bit of a break. Instead of playing a ton of barre chords, you can use familiar shapes to play chords that we’d otherwise need barre chords for. How do we start thinking about using our capo so we can start playing smarter instead of harder? Look no further:
Notes Don’t Change
So the best place to start is the idea that capos don’t change any location of any notes anywhere, all the do is move our lowest notes we can play accordingly. So the 3rd fret on the 6th string is always G. If we put a capo on the 3 fret and play the 6th string open that’s a G note. If we place a capo on the 4th fret or higher that G is still on the 3rd fret… it’s just not accessible anymore.
Root Notes
So now we have to take note of some of our “easier” open chord shapes and realize what note in the chord gives it it’s name. This way when we slap a capo on we understand where the actual chord name comes from.
6th String
For our 6th string we have two chord options: E’s and G. I say E’s because both E and Em share the same root note: the 6th String Open:

So this means whatever fret I put the capo, that note on the 6th string open is the name of the chord. Here are a few examples:

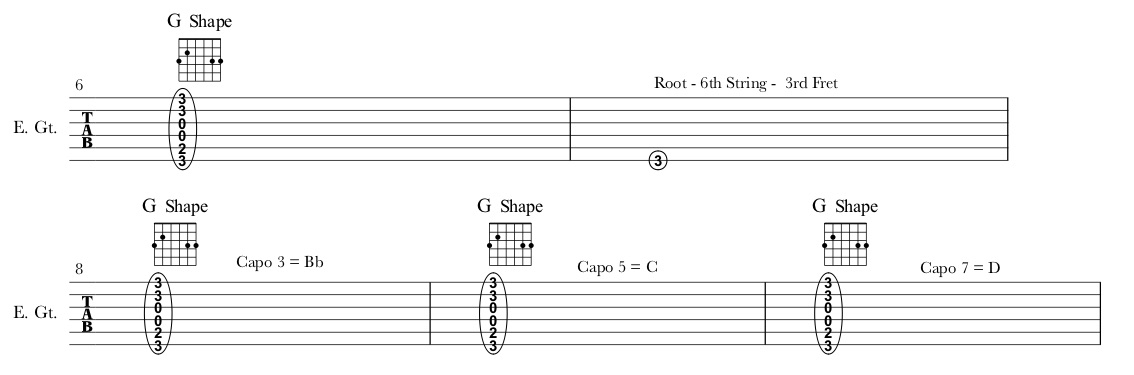
Now the G chord’s root note is the 3rd fret on the 6th string, so whenever I play a G shape the root note will now be 3 frets above where the capo is located:
5th String
For the 5th string, we again have two chord options: A’s and C. Much like the 6th string I saw A’s because the root note doesn’t change between an A Major and an A Minor Chord. The root note is found on the 5th string open for both:

Now this means wherever our capo is, that fret on the 5th string will hold our A or Am shapes actual chord name. Here are a few examples:

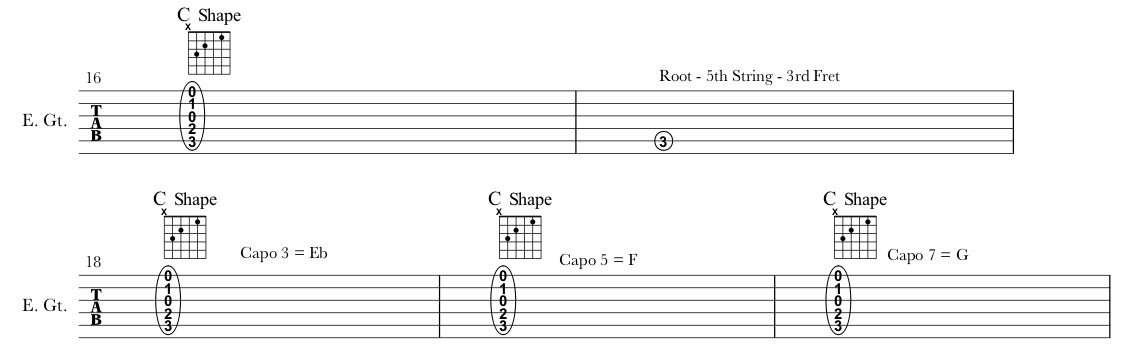
For C, we again have 3 frets above but this time on the 5th string. So much like the G it’s whatever note is 3 frets above our capo:
4th String
Now for our D shapes it’s the 4th string open. Since I don’t recommend learning the 4th string through the same means as the 6th and 5th (Know Not Memorize Your Fretboard) by itself, I’ll be drawing on another way (Know Not Memorize (The Rest Of) Your Fretboard – Blog Post) to find the root notes… octave patterns! So wherever you place your Capo draw a mental line 2 frets before on the 6th string to get your actual chord name:

Here are a few examples of moving the capo around:

Let’s Put This Stuff to Work!
Now that we have base of how we can move these root notes around, let’s start using it. Before moving forward, I should say that this doesn’t mean we won’t ever have to play some barre chords but I think we can find a lot less if we get familiar with using our capo to play smarter not harder.
So let’s take a chord progression:
Eb – G – Cm – Bb
Without a capo this is going to be a ton of barre chords. Now to pick where we’ll place our capo, what we’ll do is just pick an easy way to play an Eb. Well I know an Eb is on the 5th string 6th fret, so what if I play that as a C shape? Well I’d have to put my capo 3 frets before the Eb note. Where to find the other notes? Let’s take a look!

Wow, we’ve got some easier shapes to play the G, Cm and Bb! I’m not even using a lot of different root notes, still relying on just 5th and 6th strings to find my roots but just looking at them a bit different.
How about another chord progression?
B – F# – G#m – E
Again, I’m going to focus on making my first chord easier to play so I want to play it as a “G” shape… B is on the 7th fret 6th string… so I need to place my capo 3 frets before that (on the 4th fret) and I’ll get:

The hardest part of this is the F# chord as a D shape.
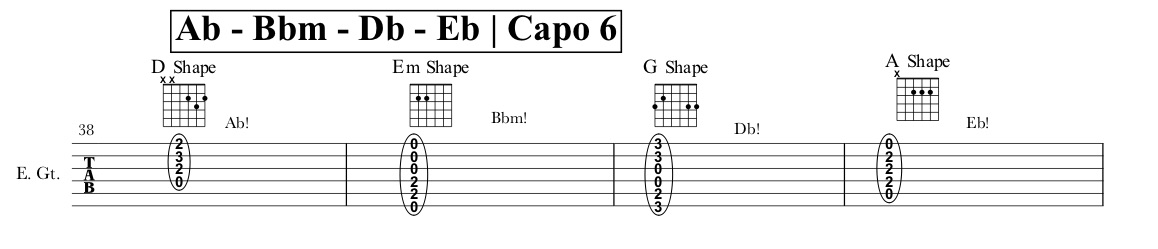
Alright for my final example I’ll be going through the same chord progression using three different capo positions so you can get a feel for how each one works:

Thanks for checking it out and let’s see if we can work on playing smarter, not harder!
Dig.